
|
|

| Sections: | |
|
1. Install a Regulator 2. Flow Modifications - Higher Flow Valve - Higher Flow Valve Pin - Remove ASA Filters 3. Install a Spring Kit 4. Fine Tuning | |
| Section 1: Install a Regulator To lower the input pressure you use a regulator. The normal unregulated input pressure from a CO2 tank is around 800psi. This is assuming that there is perfect weather out. The whole point of going 'low pressure' is to lower the pressure your marker fires at. This is achieved by using a regulator. You can buy any basic regulator, or you can buy a high performance one. The key difference between then is that a high performance one will generally perform better. (duh) It will offer better pressure consistency along with a higher flow rate. If you don't have a high flow rate and you fire rapidly your marker will not completely cycle, and you will have to recock your marker. It's really more of an inconvenience than anything, but when you're in a shoot-out, you won't have time to recock your marker. I will add more on this later, but for now, you just need to get yourself a regulator. Note: If you're using a PMI vertical regulator (comes stock on PRO EXT, PRO TS, PRO TS w/ Storm, and PSI) you need to remove the shim to make it regulate pressures below 500 PSI. |
| Section 2 (Part I): Higher Flow Valve Since your marker will be running at a lower pressure, you need to compensate by releasing a higher volume of air when you fire. Check out this flash movie I made to help you understand this: When you fire your marker at high pressure (around 800psi) CO2 or HP goes through the valve at a high speed, and the valve is open a short amount of time. When you're running low pressure (around 200psi or lower) the CO2 or HP is moving a lot slower, but the valve open for the same amount of time. When you're shooting you need to have the same amount of CO2 or HP travel through the valve in the same amount of time, so you need to make it higher flow. These two pictures, are of the REAL turbo and stock valves. The turbo valve is a part made by PMI, which can be purchased at any paintball retailer that sells PMI Parts.  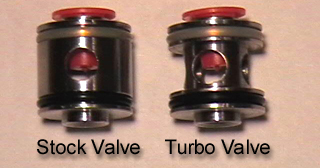 |
| Section 2 (Part II): Higher Flow Valve Pin Along with making your valve flow better, it is a good idea to install a high flow valve pin. This is just a stock valve pin that has had part of it removed. To modify your valve pin take it out, and use a lathe or a file to make it look more like a baseball bat. This will allow more air to flow through the valve every time you fire. Here is a picture:  Here is another flash movie to demonstrate how this works: |
| Section 2 (Part III): Remove ASA Filters Another simple (and optional) modification can be to remove the filters in your ASA. These filters can slow down the air moving from your tank to the Ram-Air Chamber, so if you remove them, you're helping to make your marker flow better. 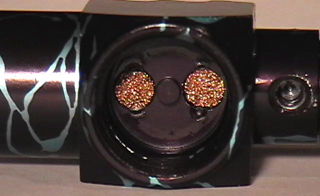 To remove these you can try to pry them out with a screwdriver, but if that doesn't work you'll have to use a drill. It's probably easier to take the ASA off and put it in a vice. If you use a vice another good idea would be to get an old rag or towel to wrap around it so you don't scratch the finish. When you've succesfully drilled them out get all the little bits that fell into the ASA. Be sure to get everything. Any small bit of metal in there could damage your cup seal, valve, or any other internal part. The easiest, and best way is to use an air compressor to blow them out. That's all there is to it. |
| Section 3: Install a Spring Kit A spring kit will make the hammer dwell on the valve pin longer. Or, basically, hold down the little pin so more CO2 gets out each time you fire. If you have a stiffer spring, more is released. If you have a more loose spring, less is released. I talked about compensating for the lower pressure in the beginning and this is where you really compensate. Springs come in kits with different tension levels, usually designated by colors. So depending on how high or low you want your velocity to be you can adjust accordingly. When you buy any Piranha it comes with 2 different tension springs, but neither of them are stiff enough to help in this case. A very good spring kit to get is the Chameleon Spring kit. It comes with 6 precision springs, so you can fine-tune your velocity. 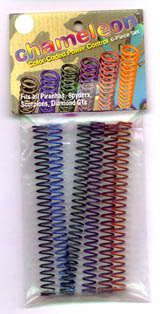 |
| Section 4: Fine Tuning Now that you've successfully made your marker low pressure, you need to actually apply this, and make it shoot correctly. First off, you want to set your pressure. Follow the instructions in the manuel that came with your regulator to find out how to do this. You want to set your pressure low, (obviously) but if you set it too low your marker won't cycle fully. I'd go for 200psi, and work my way down if necessary. Basically, you just want to make your marker shoot, reliably, at your given pressure, while keeping your velocity around 280 feet per second. If you're velocity is way too low, then you'll want to put in a higher tension spring. If it's way too high, vice versa, put in a lower tension spring. Just keep switching springs until you get into the general area of your velocity, then you can fine tune your velocity with the velocity adjustment on your marker. Turn it clockwise to make it higher, and counter-clockwise to make it lower. |
| Done! Uhh, that's it. |